Translate
Return to shop

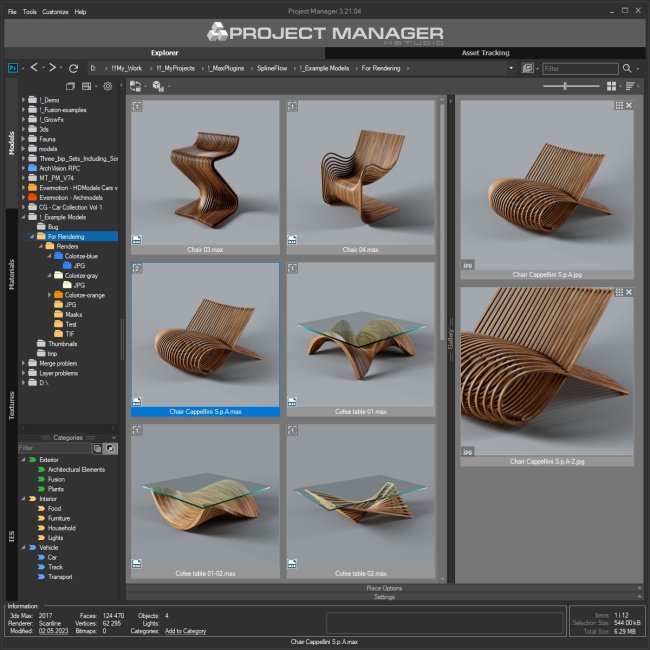
Kstudio’s 3DS Project Manager makes working with 3D models easier than ever.
Not only does the plugin allow you to easily locate and organize your models, but also lets you set specific tags, placement options, and paint/clone settings.
The following tutorial will provide a brief overview of how clever use of the Models tab can help you with complex projects.
Also, you will learn about the different ways we can add our 3D content to the scene.
https://youtu.be/NyB-N-DJSiw
Merge 3D files in several ways
A key point here is that when using the Project Manager for import, you do not need to worry about the original format of the model you add.
Whether your model is a 3DS or an FBX, every import option in Project Manager will work for you. Naturally, not all functions will be available for importing third-party formats. Let’s take the 3DS format. It can’t be loaded into the scene via xRef, but it does not matter much. What is important is that you don’t have to care about which format your model is stored in and how you import it. Just drag it into the viewport or add it to the scene with a double click.
Apart from that, Project Manager lets us render such models interactively. This especially applies to older collections where models are often presented in OBJ or 3DS formats.
In the Models Tab of Project Manager, there are several ways to merge 3D files.
One of the simplest ways is the Drag & Drop method, which allows for more direct control.
Merge using Drag&Drop
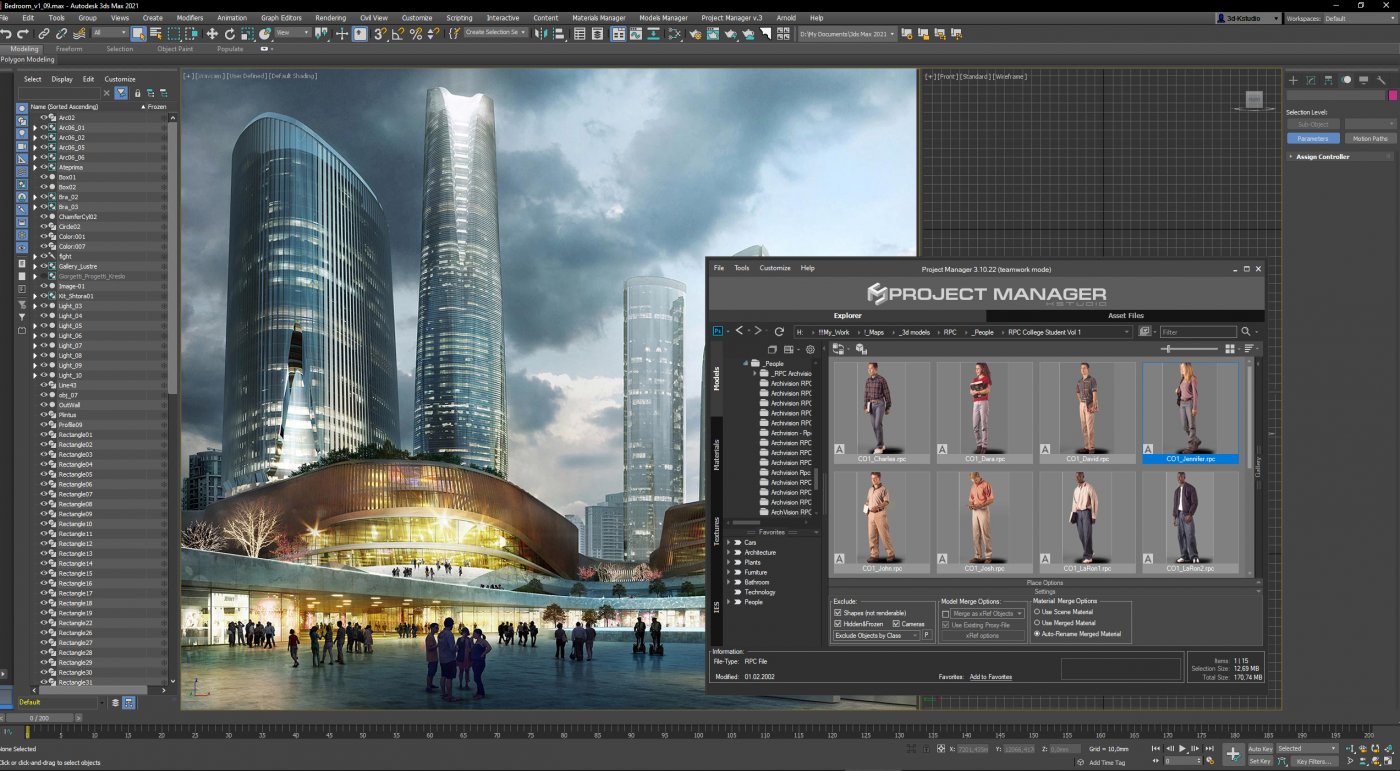
First, we find the model we need in the catalog and drag it into 3ds Max viewport.
If we hold down the SHIFT key, the model stops moving with the cursor, which allows us to change our settings in the “Place&Paint” panel. And if we hold down SHIFT and CTRL, we can freely rotate the model along the Z axis. By holding down CTRL and clicking the left mouse button we can rotate the model 90 degrees counterclockwise.
The ALT and left mouse button combination lets us turn the model 90 degrees clockwise. A right click stops the placement operation altogether. Right here at the top, we can see the “Place&Paint” panel, which can be customized for our particular needs.
https://youtu.be/5AOFDup5ax4
Drag&Drop + SHIFT
Holding down the SHIFT key while dragging the model into the viewport will summon the standard 3ds Max menu, which we usually see when dragging the model from Windows Explorer.
https://youtu.be/jWtb54vjo68
“Place&Paint” panel: placing 3D models in several ways
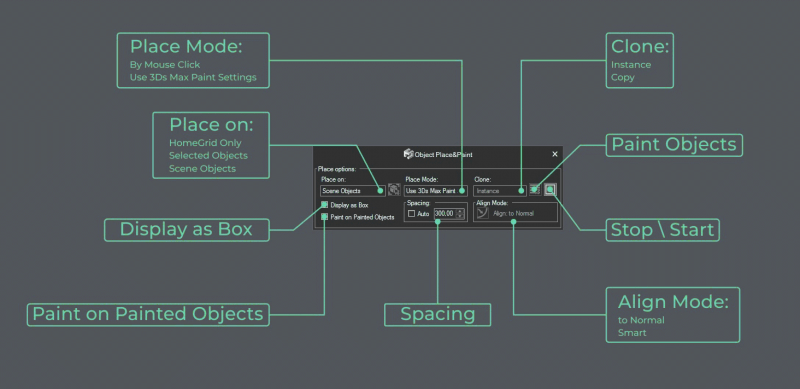
Let’s take a look at what this panel lets us do. The “Place&Paint” panel can help us customize the process of placing the model into the scene. We can adjust these settings both beforehand and when we’ve already begun importing our model.

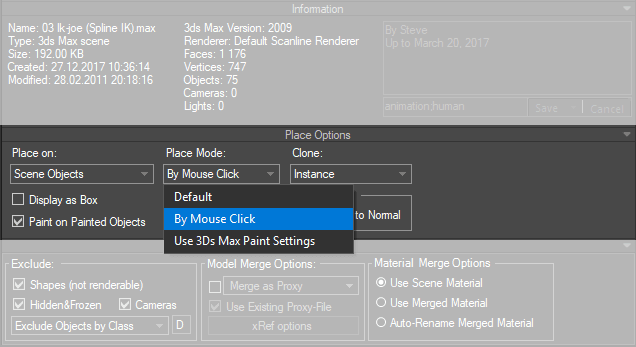
Place Options
Place Options - Target Surface
Place Options - Place Mode
https://youtu.be/f-W_uUXAhWw
“Place On” menu settings:
The “HomeGrid Only” option lets us place the model on the default grid in the viewport. “Selected Objects” option places the model on any selected object in the scene. Note that if we do not select those objects before we start importing, we are prompted to do so on the fly. In the “Scene Objects mode“, we can place our model on the surface of any object in the scene.
It is important to understand and appreciate the complexity of your scene.
If the scene contains lots of objects, this mode can cause the viewport performance to slow down, because the imported object will try to “hook” itself to every geometry in the scene.
A better choice for complex scenes is definitely to pinpoint the objects using the “Selected Objects” or “HomeGrid” options.
Align Mode
Before adding a model to the scene, we can set the alignment mode of the model, which is done in the “Align Mode” group. The default mode here is “to Normal”. The added object is aligned with the normal of the object it is placed on.
“Align to Normal” is suitable for most cases, but if, let us say, we planting trees on a tilted surface, this mode will produce an incorrect result.
In such a case, it is better to use the “Smart” mode. In the “Smart” mode, a model can remain vertical when placed on a tilted surface.
Smart mode suits for planting trees on mountain sides, putting paintings or sconces on the walls, and other similar situations.
Clone, Stop/Play, Paint Objects
“Clone” menu lets us choose a copying mode for the model: “Instance” or “Copy“.
Right next to it, there is the “Stop/Play” button, which is used to stop the painting process. Why would we do that? When we stop painting, we can add or remove some objects for copying and placement.
This is done in the “Paint Objects” dialog box, which becomes active after we click the “Stop” button. When we are done changing the list of paint objects we can resume painting by clicking the “Play” button.
Place Mode
The “Place Mode” menu lets us set the painting mode. The default mode for painting objects into the scene is “By Mouse Click“. This mode is suitable for pinpoint placement of objects.
In case we need to actually paint with objects, we should select the “Use 3ds Max Paint Settings” mode. By holding the left mouse button, we can literally paint with geometry.
“3ds Max Paint Settings” mode, based on standard feature of 3Ds Max known as “Paint Objects”.
Here you can read more about Paint Objects Panel

Right mouse button click stops the painting process, and now we can assign new paint objects and continue.
The “Spacing” option sets the distance between the cloned objects. When the “Display as Box” parameter is on, the object is added to the scene as a box, which is important for speeding up viewport performance when painting with high-density mesh models.
Enabling the “Paint on Painted Objects” mode lets us paint objects onto the surfaces of their own clones within the same session. For example, when this option is turned off, the added object ignores its clones and interacts only with the objects in the scene. If, however, we enable the option, the object can be placed on the surface of its own clone.
Merge using Double click
When the exact location of an added object in the scene doesn’t matter, the fastest import option would be a double click.
Models from the selected file will be merged and placed in the current scene without any additional dialogs. One double click – and the model is instantly in the scene.
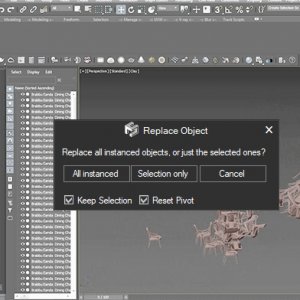
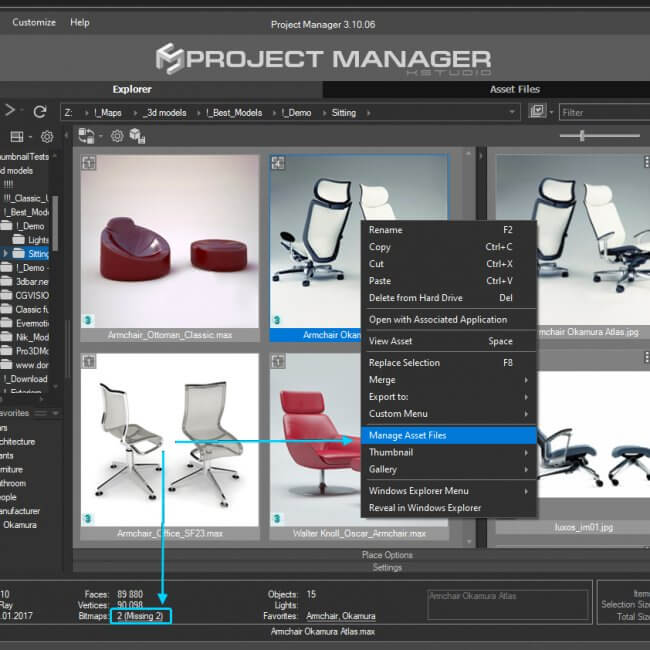
Replace Selection
Objects in scene may also be replaced to objects from file by using the “Replace Selection” option, pictured below.
This option allows for one-by-one object replacement so you can easily modify your project back-and-forth to get the perfect scene.
https://youtu.be/xuj3xADa22M
This is not an importing function per se, but what it does is add a model to the scene through replacement.
This function has several options.
Clicking the “All instances” button will replace all objects in the scene that are instance copies of the selected object by an object chosen from the library.
“Selected only” will replace only the selected item. And now for the additional replacement conditions. If the “Keep Selection” box is checked, the object being replaced remains in the scene. Uncheck this box and the replaced object will be deleted. “Reset Pivot” resets the pivot of the imported model.
Merge using standard 3Ds Max functions
The next few options allow calling standard 3Ds Max functions for merge 3D models
You can find them under the “Merge” menu are “Merge with Default 3DS Max Dialog” and “Merge as xRef Scene”.
Selecting “Merge with Default 3DS Max Dialog” will produce the following dialog box:
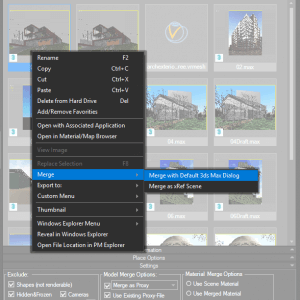
Merge with Default 3ds Max Dialog
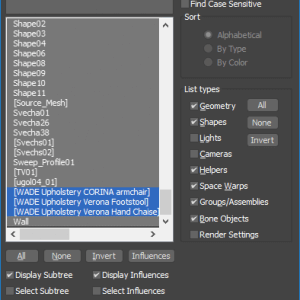
Standart 3ds Max 'Merge File Dialog'
See also: Merge File Dialog
The “Merge with Default 3DS Max Dialog” option is right for the cases when you need to add only a part of a model or if you need to insert an animated model while preserving its hierarchy. From here, you can select multiple objects to merge into a scene.
The “Merge as xRef Scene” option adds the model to the scene as an external link, that is, as an xRef scene. Including the Dummy bonus, which allows controlling the position of the xRef scene.
https://youtu.be/1XG9EwOi56k
Merge Animated Models
There are a few options to keep a hierarchy for an animated model:
- Merge using double-click on 3D file
- Merge using the menu-item “Merge with default 3Ds Max Dialog” from the right-click menu “Merge”
- Hold the SHIFT key when dragging a model.
Setting. Some special merge options
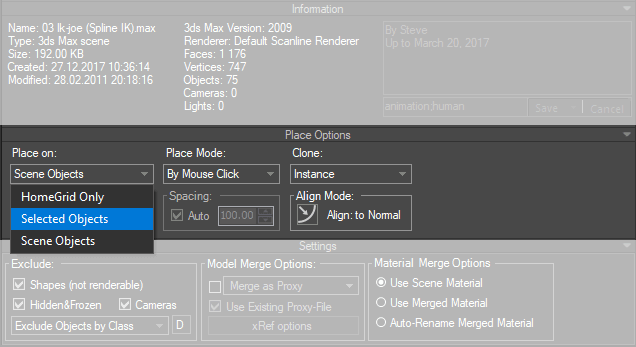
In the “Settings” section, we can adjust some special import options.
The settings of the “Exclude” group let us exclude objects from import by a certain class. Quick default options exclude splines, frozen and hidden objects, and cameras. We can set additional exceptions and make them into a preset in the “Exclude Objects by Class” menu. This means that we save the import settings with the list of necessary exceptions.
In the “Model Merge Options” menu, we can specify to convert our model into a proxy when merging. Of course, we can also use the existing proxy file for this model. We can also choose to import our model as an xRef file.
https://youtu.be/NRSWazvA6VU
Sometimes the materials in the scene and the imported models may have the same names.
We can avoid duplicating materials by choosing suitable import conditions for the materials in the “Material Merge Options” menu, such as “Use Scene Material“, “Use Merged Material“, “Auto-Rename Merged Material“.
Merge as a Proxy
In addition, 3D models can be merged as a Proxy or merged as Xref objects.
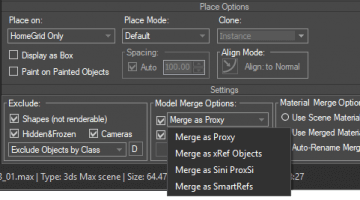
Models - Place Options & Merge Settings
Proxies can be created from files such as .VRMESH, which produces a Vray Proxy when dragged into the viewport.
Due to Project Manager’s support for many renderer engines, you can use Vray, Corona, Mental Ray, Octane, Maxwell and many other types of proxies in your scenes.
To enable the converting of models to proxies, tick the checkbox as seen in the image below.
The type of proxy will depend on the active renderer for your scene.
So using Project Manager you can convert your 3d models on fly to Corona Proxy, Vray Proxy, Octane Proxy, FStorm Proxy, Sini ProxSi and etc.
Also, the Project Manager has the unique ability to store proxies with materials.
Also in this menu, you can choose the options “Merge as xRef objects”, “Merge as Sini ProxSi” or “Merge as SmartRefs”.
The last two options are available if you have installed Sini ProxSi and SmartRefs plugins.
Export Models. Save Models from Scene to Library
Batch Export Models
Models can be exported to a variety of formats, shown below.
This handy feature adds greater compatibility to your projects, should you need to access them in any other program.
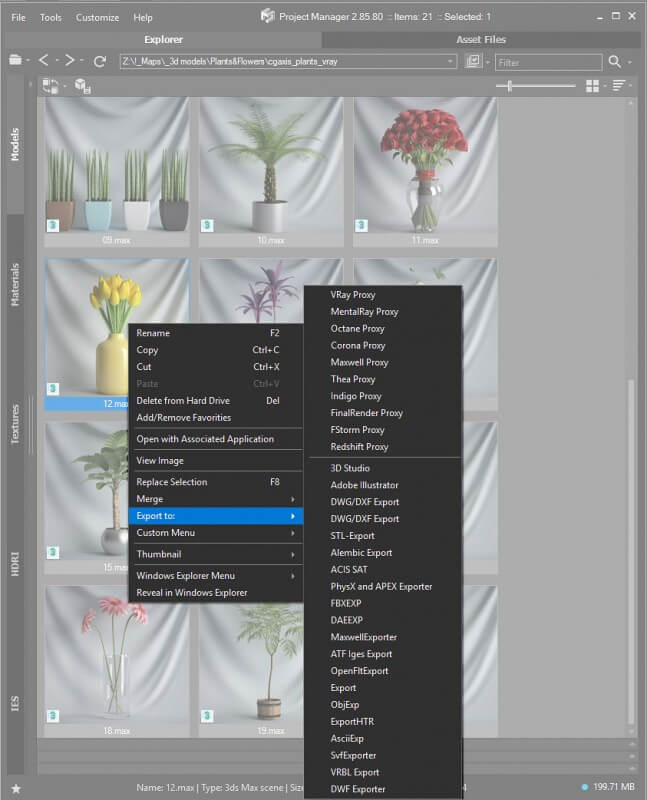
Export 3D Files in batch mode to to a variety of formats including proxy
Save Models from Scene to Library
Objects can also be added to the library directly from a scene, as illustrated below.
By clicking on the indicated button, a context menu will appear, and you can save the selected model along with a screenshot and used bitmaps.
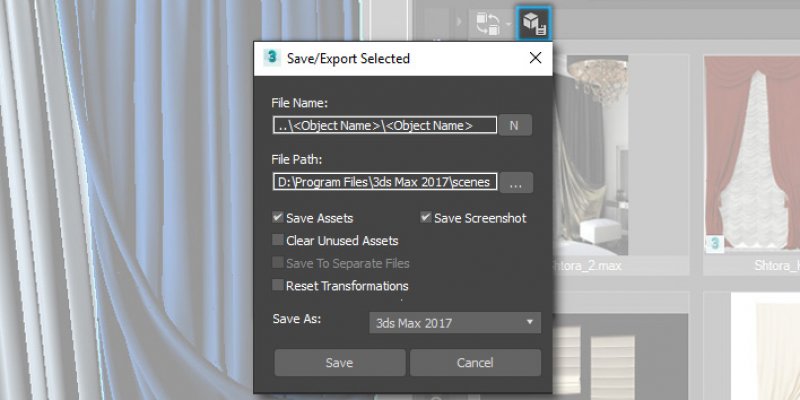
Save Models from Scene to Library
Render&Relink
You can also render thumbnails, either directly from Project Manager or by using the “Batch Render & Relink” Tool, found under the “Tools” Menu toward the top of the Project Manager window.
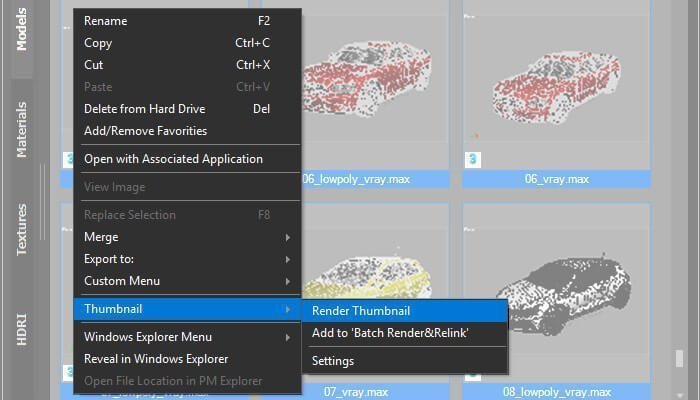
Rendering Preview for 3D files
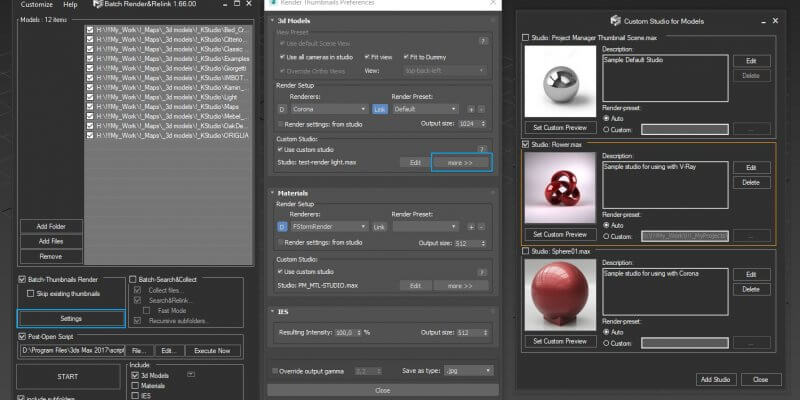
Batch Render&Relink + Rendering Preferences
Here, you can also easily relink 3DS files, or do so directly from the Explorer Tab.
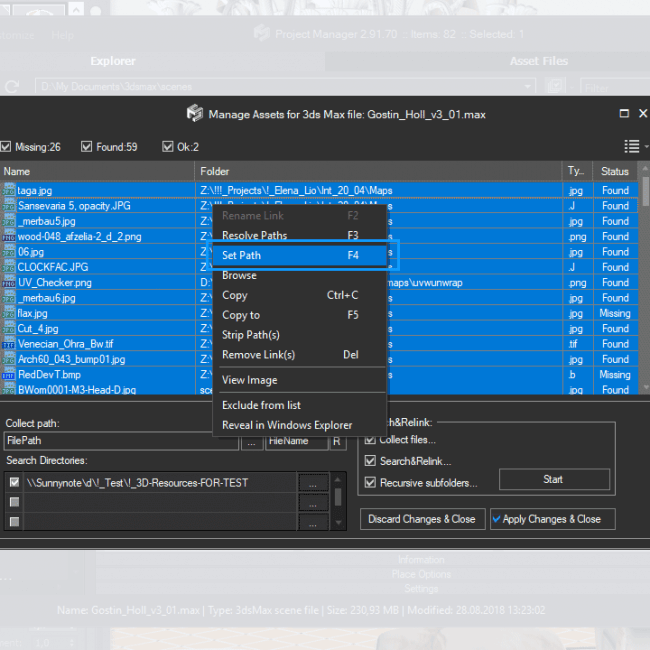
Manage Assets for 3D models
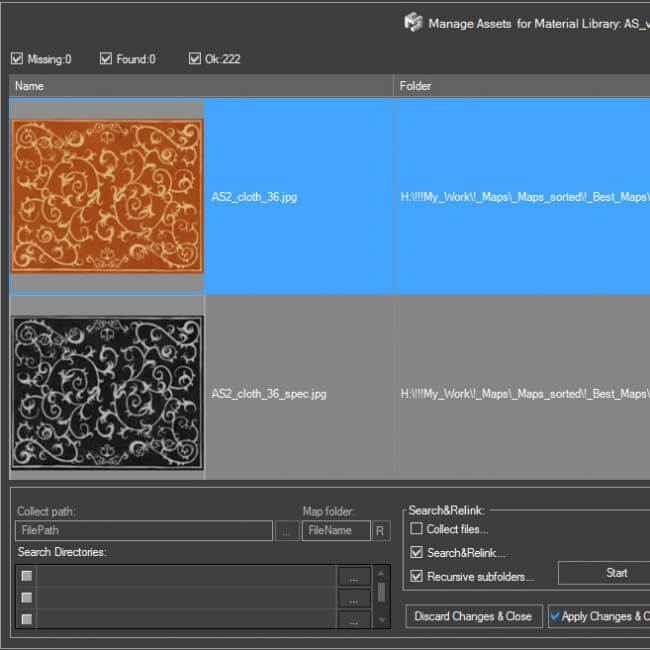
Manage Assets for 3D files
With the above mentioned features, it is now easier than ever to save, access, and use your project files.
With Smart Align and Drag and Drop, placing and merging objects and models becomes a more intuitive process that saves time.
In addition, the wider variety of supported formats means greater flexibility with your projects.
Original price was: $60.00.$48.00Current price is: $48.00. Add to Cart
Related to "Merge and Manage 3D Models using Project Manager"
Shop
Compare Plugins for Asset Management in 3Ds Max
Utility | Plugins
Project Manager

CG News in Pictures
Globosome FMX trailer
Kstudio Blog | Tips&Tricks
Asset Management Using Project Manager
Applicable to:- Project Manager
- Models Manager
- Project Manager
- Models Manager